Thursday, September 5, 2013

Microlight and ultra-light flying in the UK - Little Gransden Airfield and Cambridge

A friend from walk mentioned a little while back that he picked up his pilots license in May and offered me a ride in his microlight some time. That opportunity happened yesterday evening after work, a beautiful clear still warm day, maybe the last good day of the summer!

Ikarus C42


The plane is an Ikarus C42 microlight (or 'ultra-light' in the US), similar in size to the Cessna 152 I've flown but much lighter with wings covered in a kevlar composite material. The instruments and engine controls are simpler, no carb heat or mixture, no attitude or heading indicators, it's designed for daytime VFR flight only. The aileron and elevator is controlled by what's best described as a joystick in the center between pilot and passenger, no dual controls on this one though both seats do have their own rudder pedals and throttle.


The ride and performance were great for a little plane, cruising around 80 knots and climbing without too much effort. Once David opened the throttle we were off the ground in not time. The cabin has great visibility too with a wide windscreen and big windows on the doors too.

Wimpole Hall (National Trust)
We flew out of Little Gransden airfield which is in the countryside to the west of Cambridge. It's a small grass field with a mixture of planes including Yaks, stunt planes and microlights.We headed east to Cambridge with views of Wimphole Hall, Duxford, Addenbrooks, My office and Fulbourn along the way. We couldn't fly right over Cambridge as it's controlled air space for Cambridge airport. That would require a UK radio license which neither of us have.

 I knew the Addenbrooks hospital was big but wow, when you see it from the air it's huge!

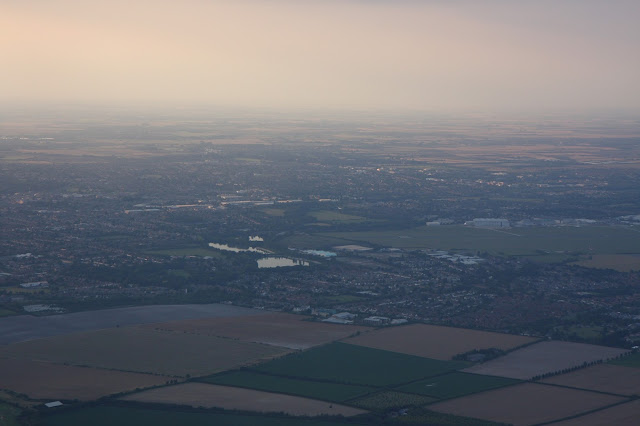
The picture above shows the east side of Cambridge with the ARM office in the foreground middle backing on to fields, Cambridge airport to the right middle and Cambridge city center to the left middle. Cambridge really isn't a very big city at all when you see it from 2000ft!

Next we headed south past Granta Park, towards Saffron Waldon coming close to Stansted airspace. David uses an Android Tablet loaded with Skydemon software to give him a moving GPS map with visualization for air space and live NOTAM (notice to airmen). It also allows you to plot follow a flight plan. Looks like a really useful application!


We then headed west over a scenic village called Barkway (where David lives).


Then Royston and Bassingbourn Barracks. Here you can see clear evidence of the remains of an old world war two airfield. Looking down on shapes like this is a kind of airborne archaeology; it's often much easier to see interesting patterns from the air that you would never see on the ground.


Of course the flight was over far too soon and we headed back to the air field. The pattern was straight forward, a left base entry announcing yourself on the radio at on the way in, the again when on the ground and taxiing back.

The cost? It's probably no surprise this little microlight is about a 1/3 the cost of renting a plane from Cambridge airport. The airfield costs and running costs are much less. In fact it's really made me think about taking up flying again, this might actually be affordable :)

Thank you again to David for the flight, it was great to see Cambridgeshire from 2000ft!

All the photos from the flight are geolocated with gpsed: and on Flickr.

Sunday, September 20, 2009

Cessna 172SP Skyhawk Essentials - what you need to know for a checkout (Flight 68)

Flights 65, 67 and 68 have been with my instructor Patti to get me checked out in the 180HP Cessna 172SP Skyhawk. I thought I would write some notes into my blog detailing the things I've learned, and the differences between this and the other Cessnas I've flown (C152 and C182). Pictured left N668TW, a 2002 model in great condition and the 172SP I've flown the most.

The 172SP is the latest in the long line 172's, see the wikipedia page for more info on differences: http://en.wikipedia.org/wiki/Cessna_172.

The most common Cessna's you will see at West Valley and other flying clubs:
  • C152 - 110HP, the compact 2 seat trainer I did most of my private pilot license in
  • C172N, M etc - 1970's, 160HP, standard carburetor (carb heat control)
  • C172RG - Retractable Gear, therefore a little specialist and used as a complex trainer
  • C172S (aka SP) - 1998 onwards, 180HP, fuel injected engine, fixed pitch prop
  • C182T - 230HP, fuel injected, High Performance, variable pitch 3 bladed prop
  • Note C172 and C182 also have G1000 options, labeled as C172SG1 and C182G1 (or G1000).
As you can see from the list, the C172SP is in the middle of the range, in many ways the modern SP has a lot of similarities to the C182, the big difference being a little smaller, lower power and without the variable pitch prop. I have flown most of my hours in the small C152, but more recently over 17 hours in a C182G1000 during some fly out group events with the club. After all the c182 hours I felt at home in the 172SP, there are a lot of similarities. The sections below detail the highlights and key differences with this plane.

Fuel and loading - 100 and 100LL, 53 gals max usable
The fuel selector can be switched between L, R and Both. In addition there's a small red Fuel Cutoff Valve just above it. (The 152 has just a fuel on/off, the 182 has a selector which can switch adds a off position). Fully loaded it can carry 53 usable gallons which can take you 512 NM (at 75% power, 6500 ft, 45 min reserve). Typically though the plane will be fueled to the tabs which is 35 usable gallons, and this gives you more room for passengers and baggage. Talking of weight and balance, with typical fuel (35 gal) N669TW can carry 619 lbs of pilot, passengers and baggage. Of course you need to perform a detailed W&B but that's approximately 4 people of 154 lbs and no baggage, or 2 people with lots of room for camping gear!

Priming and starting - much like the 182T, and unlike the 152 and older 172's there's no manual priming pump. Instead use the electric pump, push the mixture to full to the count of 3, then to lean to the count of 3. Waiting for the fuel flow gauge to show a reading will often over prime which can lead to backfires on starting.
Starting is like the 182, turn over, on firing push in the mixture to rich, THEN adjust throttle, before leaning the mixture for peak RPM.

Carb Heat and alternate air - the 172SPs (and 182Ts etc) don't have a carburetor, but instead have fuel injection. Therefore there's no Carb Heat control, and the alternate air intake is automatic by means of a spring loaded flap.

Rudder - there's no rudder trim on the 172, so every climb is a workout for your right leg! (the 182 has a rudder trim which is set for take off, and needs adjusting as you move to cruise). I had to remember to keep looking at the turn coordinator to check I was pushing the rudder enough.

Avionics - COM, GPS, ADF etc
There are a few more black boxes to play with than the 152! It's great to have 2x COM (radio) units, which can often be setup so you can listen to both, e.g. NORCAL and ATIS. Many planes also have an Auto Pilot.
[picture right shpes top to bottom, L to R: Audio Panel, Audio panel, Map screen, GPS, COM/NAV 1, Auto Pilot; COM/NAV 2 and Transponder].

Autopilot (AP) - The non-G1000 models have a range of different autopilot setups. Typically it will be a KAP140 AP hooked up to a GPS which may have an additional map screen. Single axis AP controls the heading only, dual axis controls altitude and adds a MET (Manual Electric Trim). The AP can be disabled by it's on-off button, the red button on the yoke, and the pullable circuit breaker.

Key points to note about the AP:
  • Make sure the GPS receiver is enabled (you may need to 'OK' a number of messages)
  • Separate MAP screen (if included) is just a slave device to the GPS unit, you cannot use it to Flight Plan etc.
  • KAP140 pre-flight includes turning it on during run-up to check it can be overpowered and turned off.
  • KAP140 has it's own static port, and barometer (BARO) setting
  • When first powered up the AP will be in ROL mode which will hold heading and altitude
  • HDG (Heading mode) will command the autopilot to turn to the direction selected by the Heading Bug (see extra marker and control on the Heading Indicator)
  • NAV (navigation mode) will command the AP to follow the planned GPS route (which should be setup before you press the NAV button ;)
InstrumentsThe basics are the same, altitude, attitude, heading, airspeed, tach, vor, turn coord etc.
The differences and additions include two VOR receivers, an electronic VOLTS/AIR TEMP/TIMER display, fuel flow gauge and exhaust gas temp gauge.
Landing
It took me a little while to perfect the landings, in all we practiced 17 landings between Palo Alto and Half Moon Bay. The biggest difference with the 152 is the view of the runway through the windshield, and getting a feeling for what's straight and centered. I found the line of rivets on the bonnet needs to be lined up just right of the runway center line.
The other difference is the flaps and speeds in the pattern. From key point at 800 AGL to landing the plane seems most happy around 1500 rpm, 75 knots downwind, 70 base and 65 final. On short final the landing is most effective if you start pulling back on rpm as you enter ground effect, aim for idle just past at the end of the run way.

Engine out landings
Remember 68 KIAS fully loaded, and 59 KIAS at 1900 LBs.
The full flaps (30 degrees) are VERY effective, and for a power off landing they really cause the plane to drop so hold off unless you're high, or you're sure you'll make the runway.

Flying! Flying is of course the fun bit! It's certainly got a lot more power than a 110HP 152, an you really need to push the right rudder to compensate for the P-factor in the climb. When it's in the air it's a very stable, smooth and powerful. It likes to climb, it likes to keep its speed. Slow flight, stalls and the like put it out of it's comfort range, you'd have to do something really wrong to get this to stall!

During the 3 flights I did for the checkout the first was a short flight over the bay area one very cloudy (FEW040, SCT060?) and turbulent afternoon working on some maneuvers, and getting used to the plane. The second took us over to Half Moon Bay (a very clear day at the coast for a change, and a very empty HAF). And the third was just some pattern work before colorful sunset to perfect those landings. There's never a bad day to fly in the bay area ;)

If you're a pilot looking to flying a 172SP I hope this info is useful!

Neil.

Monday, October 13, 2008

Tips for Short and Soft Field Take off and landings - PPL flight training (Flight 30)

Moon Rise

This lesson was all about short and soft field take off and landing.

As we get closer to winter the days are getting shorter and the sun is setting so early that it's hard to get any flying done in the evenings after work. This evening we started with some ground review talking about compass errors and short and soft field operations. By the time we took off the sun had almost set so we flew mostly in twilight and watched the moon rise each time we went around the pattern.

The picture to the right shows the reflection of the moon in the water of the south bay on a very low tide. You can also see the hills over on the east bay.

Short Field Takeoff

The aim is to take off with as little runway as possible, and get over a 50ft obstacle with as much clearance as possible. The required steps for a 152 are:
  • Use as much runway as possible when positioning
  • Apply Brakes
  • 10 degrees of flaps
  • Max power, then release brakes
  • Rotate at 54 kts (pull back yoke a little more during acceleration to feel when the plane comes up)
  • "Obstacle departure speed" of 54 kts until above 50ft
  • Then lower nose and accelerate to Vx or Vy
  • Once Vx or Vy speed attained retract flaps
Short Field Landing
  • On Final, apply full flaps and enter slow flight (lower throttle, pitch up, throttle on)
  • Descent will be more nose up than normal and greater drag therefore more throttle required
  • Levelling will be closer to ground (due to slower speed)
  • Touch main wheels, retract flaps
  • Lower nose and Brake relatively hard
Soft Field Takeoff

The skills learned for this take off are applied to grass runways where it is important to keep the front wheel off the ground (or with minimum weight) as possible. When taxing it is important to keep moving so as not to get stuck.
  • Pull back all the way on the yoke to take pressure off front wheel. Apply cross wind correction if required.
  • 10 degrees flaps
  • Apply full power
  • When nose comes up ease it forward to keep front wheel off ground but not too high
  • When mains are up lower nose to accelerate in ground effect
  • Rotate at Vx or Vy and retract flaps when >100ft and at Vx or Vy
Soft Field Landing

Much like a normal 'good' landing but softened a little and with no braking.
  • Normal approach but keep a about 100 rpm of revs on level
  • Drops the revs just as you touch down to lower the plane more gently
  • Keep nose high as long as possible
  • Keep moving and do no brake
  • Call "Simulation Over" before braking to exit runway
Lesson Highlights: Practiced compass errors and short/soft field procedures

Stats: 6 landings, 0.9 hours

Tuesday, August 26, 2008

San Francisco Bay Tour - How To and Tips Guide! (Flight 20)


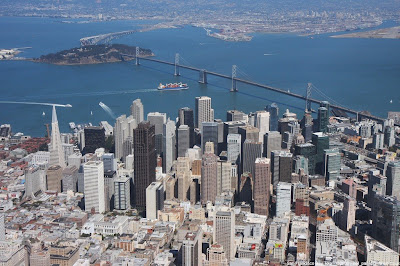
This has to be one of the most impressive flights you can do in the San Francisco Bay area, maybe in the whole of the USA? A tour of the San Francisco including Downtown, Alcatraz, The Golden Gate Bridge and everything in between. I had a few new challenges on this flight: first time through Class B airspace (SFO airport!), first time in a Cessna 172, and the first time with passengers. If you're planning a similar flight read on for tips.

Navigation and route planning

Planning the route and radio comss was an important part of the pre-flight as we were going to attempt to go through San Francisco International's class Bravo airspace. This is probably the most restrictive and busy airspace you would ever enter as a VFR (Visual Flight Rules) pilot in a small plane like a Cessna. You need permission from SFO Tower to enter the air space, and while you are there you will be given specific instructions on altitude and routing. I say attempt because there is a possibility they will not let you enter, for example if they already have a high workload of passenger jets etc.

The route itself would take us through San Carlos before being handed over to SFO Tower and requesting entry to Bravo. While transitioning SFO's airspace it's likely they will route us west of the 101 freeway at 1500ft to keep us out of the way of other traffic. A few miles north of SFO we would leave class Bravo before being handed on to Norcal Approach while we do the tour around the city. The route back takes us down the west coast for a good view of highway 1 before heading back over the Santa Cruz mountains at Woodside and back into Palo Alto.

Squawk codes and radio comms

To enter Class Bravo you need a squark code, and the easy way to do this is to ask for one from San Carlos Airport (SQL) while in the air. SQL have an arrangement with SFO where they can help manage traffic which plans to do a bay tour or transition Bravo when departing to the north. The squawk code is a unique number which is transmitted to the radar by our airplane's transponder. This allows the air traffic control to know who we are and where we are going rather than just being an unidentified blip on their screen. All of my flights until now have used the code 1200 which represents standard VFR, and is the same as all the other VFR planes not doing anything special.

Radio comms and notes from the tour
  1. 125.00 = "Palo Alto Ground, Cessna 734MK, Request taxi with Golf, Straight out departure through San Carlos for Bay tour"
  2. 118.60 = "Palo Alto Tower, Cessna 734MK ready at 31". The tower responds back with confirmation of destination and Clear to take off, runway 31
  3. 119.0 = "San Carlos Tower, Cessna 734MK, request transition, request squawk code for transition through Bravo for bay tour". SQL responds with clarification questions, and a unique squark code which must be entered into the transponder. "Squawk XXXX". We also had some traffic taking offin parallel from SQL heading out on a bay tour at the same time. This added some extra confusion with the next steps, in fact the SFO tower radio was so busy we had to do a couple of 360's over Bay Meadows race track before we reached the Bravo (we had to have permission to enter before we continued).
  4. 120.5 = "San Franciso Tower, Cessna 734MK, Orbiting over Bay Meadows at 2000ft, Squawking XXXX, Request Transition through Bravo for bay tour". The reply included permission to enter and instructions to keep west of the 101 freeway, at or below 1500ft.
  5. While transitioning SFO there were a few jets landing from the south each, and another taking off to the north west right through our intended flight path. We had some warnings from SFO to avoid the wake turbulence, so we steered a little around where the jet had been. The challenge with wake turbulence is that you can't see it, and it can last for 2 minutes after the jet has left that particular position.
  6. As we left SFO Bravo we were handed over to NorCal approach, and told "resume own navigation".
  7. yyy.yy = "NorCal Approach, Cessna 734MK, just left San Francisco Airspace, at 1500ft, on bay tour" or something similar. From here we were being tracked by radar and monitored by NorCal Approach. This would give us traffic warnings if we were close to other planes on a bay tour etc. At this point we could do our own thing, including flying round the city and the major landmarks you associate with San Francisco.
  8. On leaving the bay we requested termination of flight following and announced the end of our bay tour. Past of the reply was "Squawk VFR", which meant we needed to change the transponder back to 1200. We left the radio on NorCal approach frequency so we could hear other traffic. This turned out to be a useful decision as there was a large jet taking off from SFO and heading straight over our path as we passed down the west coast - another chance of wake turbulence.
  9. 122.80 = CTAF for HAF. Next radio freq was the Common Traffic Advisory Frequency for Half Moon Bay airport. This airport does not have a control tower, instead there is a frequency where everyone can communicate and manage themselves (see Columbia trip).
  10. 135.27 = PAO ATIS, for a check of the latest conditions at Palo Alto airport: Wind 340 degrees at 15 knots, few clouds at 10,000ft...
  11. 118.60 = "Palo Alto Tower, Cessna 734MK, over Woodside, Request landing with Hotel", reply was "Cessna 734MK, Palo Alto Tower, Ident and make left traffic". The Ident button on the transponder makes us flash on their radar screen. We were warned of some traffic orbiting SLAC, and later we requested a left base entry as PAO was not too busy. Left base entry requires aiming for shoreline ampitheatre and then turning left.
After landing there was one last frequency change required to communicate with Palo Alto ground as we taxied back to the tie down.

Test both radios!

734MK has two sets of radios. This makes things a little easier when switching between so many frequencies, but it's essential to test both radios before take off. We made the mistake of testing one radio but not the second, which had its volume turned right down. Of course this didn't give SQL a very good impression! Next time I'll use one radio for ground, and test the other with Palo Alto Tower, or at least listen briefly to something like the ATIS with each radio to test the volume.

Flying the Cessna 172

How was my first flight in the bigger 172? Actually pretty good. The aircraft felt a lot bigger on the inside than the 152, but as it was from the same year the instruments were pretty much the same, as was the pre-flight procedure. The landing felt quite different, it was clear the extra weight of the 172 meant that it was less affected by the wind etc on the approach. Also the bigger engine had a lot more power than the 152's.

Landing the 172 - on YouTube!

One of the passengers filmed the landing, see below or click here.